

WorkWORLD
 |
 |
||||
| Get Latest WorkWORLD |
|||||
|
|
www.workworld.org |
workworld@vcu.edu |
NOTE: This topic describes details about how to use the Export Tool available in WorkWORLD. See the "Export a Case File - Overview" topic for an overview of the export process, which you should read first.
Exporting one or more case files is an easy process in WorkWORLD. This topic first includes the procedural steps required to export a case, and then provides a detailed explanation of the process.
You can jump directly to these sections by clicking on their names above. If you are unfamiliar with the process, you can read each section in the order presented to learn how to export case files from WorkWORLD.
REMEMBER: External case files use the same name they had within WorkWORLD, and always have a .ECF extension. By default, they are located in the "External Case Files" sub-folder of the WorkWORLD program folder.
The essential steps required to export case files are listed below. In each step there is a hypertext link that can provide detailed information about that step.
1. Start the Export process by choosing Tools on the Main Menu, and then Export on the drop-down menu.
2. Decide where to write the files by accepting the default, or Browse to a different or new folder to hold the export files.
3. Select the cases to export from the File Export window.
4. Begin to export files by using the Export button.
5. Close the Export window by using the Cancel button.
You can export case files at any time from within WorkWORLD. If you are entering a new case, you must first save it normally if you want to export it. It is not necessary to open a case file first in order to export it. It is best to export cases when no existing files are open within WorkWORLD.
To start an export procedure, click "Tools" on the WorkWORLD Main Menu, then "Export…" on the drop-down menu:
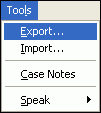
Alternatively, from the keyboard, you can hold the "Alt" key down while you type "L", then type "E":
![]() +
+ ![]() ,
, ![]()
This will cause the File Export window to appear:
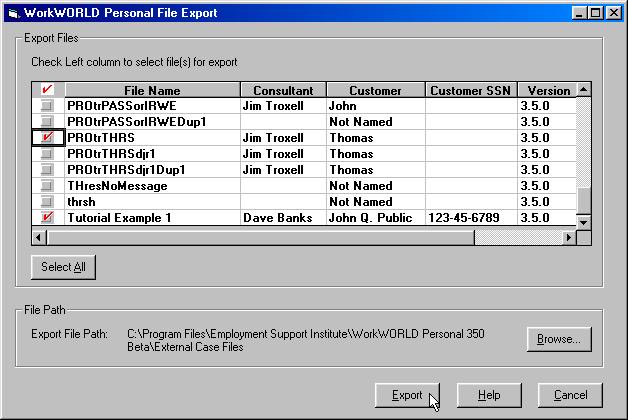
The file export window shows the complete Export File Path just below the grid. You can decide to accept the default destination folder "External Case Files" as the location for creating the exported files, or change it to a new or existing folder.
The Browse button, located to the right of the Export File Path name, allows you to either choose a different folder or create a new one as the destination for the exported files. You can click on it with a mouse or hold down the "Alt" key while typing "B" on your keyboard. This will bring up the Folder Selection window:
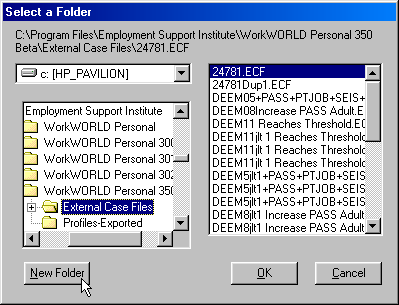
The complete Export File Path is shown as a name across the very top of this window. The path is also shown graphically in a folder pane in the middle left of the window. The drive is shown in a small pane just above the folder pane. On the upper right side of the window there is a pane which shows files contained in the selected folder.
To change to a different folder or create a new one, first select the drive. The default (the drive your copy of WorkWORLD is installed on) is shown. To change to another drive, click the down arrow button on the right side of the drive pane to drop down a list of available drives on your computer. Then highlight your choice and click on it. It will then be displayed in the drive pane.
After the correct drive is shown in the drive pane, a list of first-level folders will be shown in the folder pane. You can highlight and double-click on the folder names to reveal subfolders contained within them. As you do so, any files contained within the folder you click on will be displayed in the files pane on the right side of the window.
When you have selected the desired folder, you may create a new sub-folder in it, if you wish, by clicking the New Folder button at the bottom left of the Folder Selection window. Doing so will pop up the New Folder window:

Type in the name you want to give the new folder, and then click the Okay button to return to the Folder Selection window. Finally, click the OK button on the Folder Selection window to return to the File Export window.
The File Export window shows you, among other things, a list of all your saved case files in the form of a grid. The grid includes, if necessary, scroll bars on the right and/or bottom sides to shift what the grid displays up and down or left and right. You can use the scroll bars with a mouse by clicking on the arrows at the bar ends. Or from your keyboard, use the up, down, right, and left arrow keys to control the scroll bars.
The grid contains one row for each case you have saved. Starting at the left, the grid displays in six columns a check box (see below), the file name, consultant name, customer name, customer SSN, and version number for each case.
NOTE: You can sort on any of the columns to make it easier for you to find or keep track of the cases listed. To sort, simply click on one of the column headings. Each time you click, you toggle the direction of the sort from ascending to descending. For instance, the first click on the File Name heading will list all your cases alphabetically from A to Z. If you click the heading again, the cases will be listed from Z to A. If you sort on the Check column, all the cases you selected will be grouped together at the top (or bottom) of the list.
The first column of the grid contains a check box on each row of the grid. This allows you to select one or more of the cases for export. You can use your mouse to make a selection by pointing to the appropriate check button and clicking on it. From the keyboard, first use the tab key to bring focus to the check boxes. Then use the arrow keys to move the bold selection box over the cell containing the appropriate check box and hit the space bar to select:
![]() ,
, ![]()
![]() ,
, ![]()
The check boxes are toggled by the actions described above. That is, the first time you click on a box, you select it and a red check mark will appear as confirmation. When you click again on the same box, you deselect it and the check mark disappears. The toggle behavior is the same whether you are using the mouse or keyboard method of selection.
If you want to select all the case files listed in the grid, you can click the Select All button that is located on the left side of the File Export window, just below the grid. From your keyboard, you can do this by holding down the "Alt" key while you type "A". Note that once you use the Select All button, its function changes to Clear All, which allows you to deselect all the case files. When you want to export most (but not all) of your cases, a quick way to do this is to first use Select All and then deselect the cases you don't want to export.
However you select them, each case file with a red checkmark in its checkbox will be written out as an individual external case file later.
TIP: You can easily make a backup copy of all your cases in one simple procedure by clicking the Select All button, as described above.
When the correct folder is shown in the Export File Path, you are ready to begin exporting the files you previously selected.
Click the Export button on the bottom left of the File Export window to begin. You can also hold down the "Alt" key and type "E" to do the same thing.
If you try to begin exporting before you select any files, an error message will notify you:
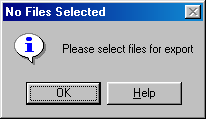
Selecting the "Help" button will pop up the "Export a Case File - No Files Selected" Help topic, and provide you further information about selecting files prior to attempting export. The "OK" button will return you to the File Export window.
Exported files are given the same name as they had within WorkWORLD. If a file already exists in the destination folder with the same name as one of the exported files, the file name of the exported file is appended with a "dup" number. A message window will notify you:

Selecting the "Help" button will pop up the "Export a File - Duplicate Export File Name" Help topic, yielding further information about duplicated and renamed export files. Selecting the "OK" button will return you to the File Export window.
If a file you export contains an invalid character in its name, the character is replaced and a message will notify you:

Selecting the "Help" button will pop up the "Export a Case File - Exported Filename Changed" Help topic for further information about how the file was renamed and invalid characters in file names. The "OK" button will return you to the File Export window.
When all the cases you selected have been converted into files, a small message window pops up to notify you:
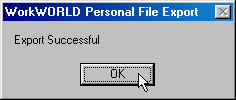
Click the OK button or hit the Enter key to acknowledge.
Finally, you can end the process and return to the WorkWORLD main screen by clicking the Cancel button on the bottom right of the File Export window. From the keyboard, you can hold down the "Alt" key and type "X". Another way to close the File Export window is to click the Windows "X" close button on the upper right corner of the File Export window:
![]()
WorkWORLD™ Help/Information System
![]() Share/Save: Click the button or link at left to select your favorite bookmark service and add this page.
Share/Save: Click the button or link at left to select your favorite bookmark service and add this page.
This is one topic from the thousands available in the WorkWORLD™ software Help/Information System.
Complete information about the software is available at: http://www.WorkWORLD.org
See How to Get WorkWORLD page at: http://www.WorkWORLD.org/howtogetWW.html
NOTE: Sponsored links and commercial advertisements help make the WorkWORLD™ website possible by partially defraying its operating and maintenance expenses. No endorsement of these or any related commercial products or services is intended or implied by the Employment Support Institute or any of its partners. ESI and its partners take no responsibility for, and exercise no control over, any of these advertisements or their views or contents, and do not vouch for the accuracy of the information contained in them. Readers are cautioned to verify all information obtained from these advertisements prior to taking any actions based upon them. The installed WorkWORLD software does not contain advertisements of any kind.
Copyright © 1996, 1997, 1998, 1999, 2000, 2001, 2002, 2003, 2004, 2005, 2006, 2007, 2008, 2009, 2010, 2011, 2012, Virginia Commonwealth University. All rights reserved.