Uninstalling WorkWORLD™ Software
General
It may become necessary at some point to remove a copy of the WorkWORLD™
program from a computer on which it was installed. A new revision or update of
WorkWORLD may require you to do this, or you may simply want to free up hard disk
space on a computer which no longer needs to have WorkWORLD installed.
Uninstalling is simple and straightforward. The actual uninstall procedure is
controlled by your Windows operating system, using information created and
programs stored by the WorkWORLD installation program when WorkWORLD was
originally installed.
Uninstall Procedure
- Start Windows. If you have any application programs running, close them all
before proceeding with the uninstallation.
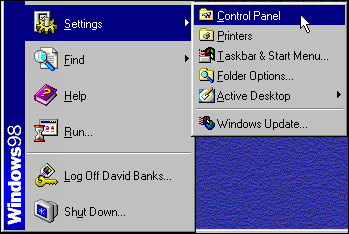
- Click the Windows Start button:

- Select Settings and click on Control Panel:
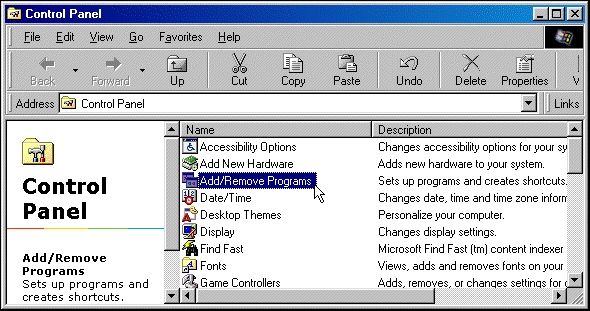
- From the Control Panel window which pops up, double-click Add/Remove Programs:
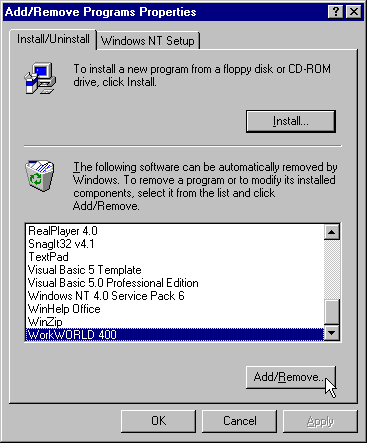
- The Add/Remove Programs Properties window will pop up. If it is not already showing, click on the Install/Uninstall tab near the top (not the Install button further down). A small window will show a list of all the programs on
your computer which may be uninstalled using this procedure. Use the scroll
bar on the right side of the window to scroll down the alphabetized list until
you find "WorkWORLD x.x.x" near the bottom. (If you have only a few programs installed on your
computer, they will all be shown and the scroll bar will not appear). Click on "WorkWORLD x.x.x" to select it, and then click on the Add/Remove button just below the program list window.
NOTE: Even though it looks tempting after you highlight "WorkWORLD x.x.x", do not click the OK button at the bottom of the window. You must first complete the selection
process by using the Add/Remove button on this multipurpose window:
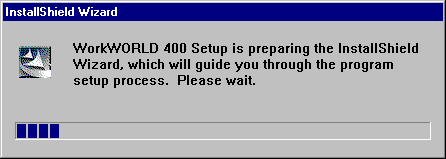
- After you click the Add/Remove button on the window above, a small Confirm File Deletion window will pop up. Click the OK button as shown:

- After you click OK in the Confirm File Deletion window, the InstallShield program wizard will start running:
Next, in most versions of Windows, you will be presented with the Shared File Detected window.
NOTE: Some versions of Windows do not display the Shared File Detected window shown below. If you do not see it, go to the next step, Step 8. The
remainder of the discussion in Step 7 does not apply to your computer system.
If your computer does display the Shared File Detected window shown below, you will be asked if you are sure you want to remove
shared files, even though you will most likely have no way of knowing what the
files are or whether it is indeed OK:
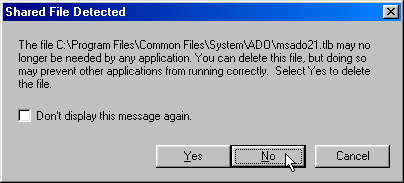
You should probably click the No button. This window may re-appear several times, each time asking about a
different file. Go to the next step (Step 8) and skip over the Notes About this
Step for Advanced Users unless you want a detailed explanation of what this
step accomplishes.
NOTES ABOUT THIS STEP (ADVANCED USERS):
Unless you understand completely the purpose of the presented files and the
programs that use them, there is the possibility that answering Yes may cause some other completely unrelated program to stop functioning.
Briefly stated, when you install software Windows keeps track of which
programs use particular files. Some files may be installed in a system directory,
making them available for use by other programs on a shared basis. When you
uninstall a program, Windows attempts to remove all files that are not used by other
programs. Some programs (not WorkWORLD, of course) do not correctly register
file usage when installed, and if you uninstall a shared file used by such a
program, it will cease to function correctly.
Choosing No means that some files used by WorkWORLD will remain on your hard disk. This
will cause no harm, but they will use a small amount of the space otherwise
available on your hard disk. On the other hand, leaving them there eliminates the
possibility that deleting them will make other programs inoperative.
If you are removing WorkWORLD software from a computer because you are in dire
need of disk space, it may be worth the potential trouble to choose Yes on this screen. Doing so will free up the maximum possible amount of space.
You should make sure that you have the installation disks available for other
software installed on your computer, in case a required shared file for some
other program is inadvertently deleted by choosing this procedure.
If you will be installing a new version of WorkWORLD after uninstalling an
older version, the installation program for the new version will detect the
presence of any unused shared files from a previous version of WorkWORLD remaining on
your hard disk. It will incorporate these existing files into the new
version, or update the existing files with a newer version.
- The Maintenance Complete window will pop up, informing you that the Wizard has completed maintenance.

Click Finish to proceed.
- Close the Add/Remove Program Properties and Control Panel windows by clicking the X button in the upper right hand corner of the windows.
At this point WorkWORLD is no longer installed on your computer, and you
should have returned to your Windows Desktop screen.
 Up to the Top


