

WorkWORLD
|
|
||||
| Get Latest WorkWORLD |
|||||
|
|
www.workworld.org |
workworld@vcu.edu |
![]() NOTE: This topic describes use of the WorkWORLD™ Help/Information System On The Web available at http://www.workworld.org/wwwebhelp.html. A separate topic, Using the Help/Information System, has information about using the Help/Information System as part of the WorkWORLD program installed on your computer.
NOTE: This topic describes use of the WorkWORLD™ Help/Information System On The Web available at http://www.workworld.org/wwwebhelp.html. A separate topic, Using the Help/Information System, has information about using the Help/Information System as part of the WorkWORLD program installed on your computer.
Information in this topic is contained in several sections. You may read through the topic in sequence, or jump to a specific section by following the links below:
· Operating Features of the System
o Hide Navigation Frame Button
· Add a Bookmark or Favorite Topic
o Add a Favorite in Internet Explorer
o Bookmark a Page in Netscape or Mozilla
· Printing from Adobe Acrobat Reader
· Translating Topic Pages into Another Language
The web version WorkWORLD Help/Information System is the same complete system that is contained within the actual WorkWORLD software program. The complete program is available from:
http://www.workworld.org/
The Help/Information System on the Web may contain new and/or updated topics that are based on information or program features not available at the time of the last release of the WorkWORLD program.
Please remember that the Help/Information System is primarily designed for operation within the WorkWORLD software program. Although the benefit information in the WorkWORLD Help/Information System should be useful to many in the "stand-alone" web version available here, the complete WorkWORLD software helps reduce the amount of information each individual has to deal with by asking questions that establish the individual's current policy situation. As WorkWORLD users try to answer the questions that apply to them, they can get information about the meaning of each question and its relevance to their situation.
The Help/Information System within the WorkWORLD program also allows users to get additional information for every Recommendation, Note, or Alert that the software provides to individual users. WorkWORLD focuses on needed information while helping the user avoid being overwhelmed by irrelevant information.
The real advantage of WorkWORLD decision support software is that it guides users to explore their own unique paths to self-sufficiency and to learn about those programs and policies that are specifically relevant to their interests and needs. WorkWORLD gives specific information about how individuals can increase their net income through earnings and work-incentive-based solutions. We recommend that people use the complete WorkWORLD software if they truly want to understand how policies affect individuals.
The description in this topic is based on using Microsoft Internet Explorer version 6 (IE6) as the browser. Other browsers can be used, but their operational characteristics may differ from those shown and described here.
The web Help engine attempts to use the most advanced features available on any particular browser, and tries to degrade gracefully on less capable and/or less compatible browsers. It attempts to determine your actual browser type, revision level, and enabled features to serve up the best representation possible. The best operation occurs when the browser can use frames, dynamic hypertext markup language (DHTML), Java and JavaScript, and cascading style sheets (CSS).
No single browser completely follows published specifications for all features. Currently, IE is the most commonly used browser by far, with a market share of almost 94% by many estimates. Because of the dominance of IE, the Help engine typically caters to its operation even when that does not follow specifications to the letter. If you can use IE, best operation will probably be obtained with it. Note that IE is included with every computer that uses Windows, and the latest version is always available free from Microsoft both through Windows Update and at:
http://www.microsoft.com/windows/ie/default.asp
All browsers allow you as the user to change and/or disable the operation of a myriad of optional features within the browser. See the Help files within your specific browser for additional information. If any of the features described above have been disabled, better operation may be obtained by re-enabling them.
Whatever browser you use, best operation will almost always result when the latest version is being used. You should check regularly for updates and upgrades, since these occur so frequently.
The Help/Information System originally was formatted for display using the help engine built into the Windows operating system. It has been reformatted so that virtually any browser can display it, but some browsers render the pages better than others. For instance, Microsoft Internet Explorer produces pages that more accurately portray the original than does Netscape Navigator.
If you have a slow dial-up connection to the Internet, it may take some time for the Table of Contents, Index, and Search tables to be sent to your browser, as they each contain thousands of entries. Please be patient, as this delay will only occur during the first time it is downloaded during each visit to this website. Operation of the Help/Information System is instantaneous within the WorkWORLD software program, since the required files reside on your computer and no downloading is necessary.
Help topics can be displayed in your browser either as full-screen pages with no navigation toolbar, or along with the navigation toolbar either in full-screen mode or as the right frame of a window split into two frames, with the left frame used for Navigation.
Help Window with No Navigation Toolbar:
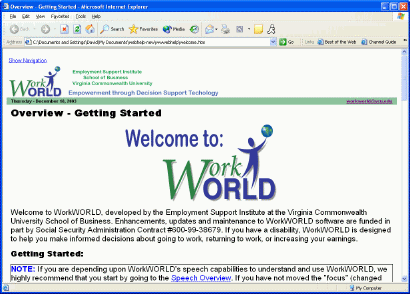
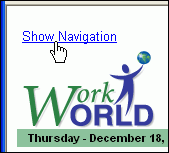
If there is not a visible blue WebHelp toolbar below your normal browser menu and toolbars, look for the "Show Navigation" link in the upper left corner of the Help page and click it to make the WebHelp toolbar appear.
Show Navigation Link:
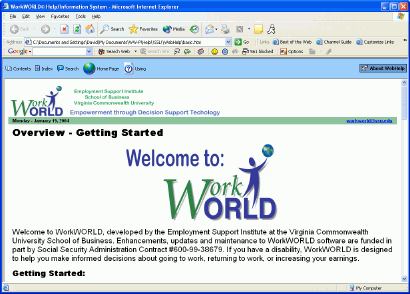
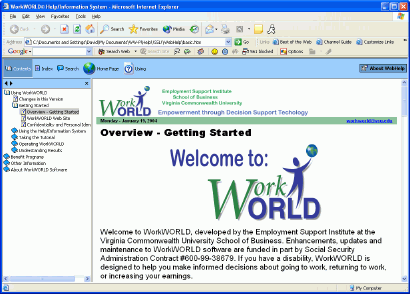
Once you make the toolbar visible, it will remain until you close the window. However, the Help topic may still be displayed with or without the Navigation Frame.
Help Window with Navigation Frame Hidden:
Help Window with Navigation Frame Shown:
The Navigation Toolbar contains a number of buttons used to control the display and provide shortcuts to other pages and information. Each button has an icon and additional text to explain its function. As your mouse pointer hovers over a button (or you use the Tab key to select it), its outline becomes visible.
Navigation Toolbar:

Clicking on the Home Page button (with the globe icon) will open the WorkWORLD Web Site topic in the existing WebHelp window, and simultaneously open the Home Page of the WorkWORLD website in a new window. In Windows, you can use the buttons on your Windows taskbar to switch between the windows, or use ALT+TAB to select which window to view.
Home Page Button:

The Using WebHelp button (with the Help topic page icon) is a shortcut to the topic you are reading, Using the Help/Information System On The Web.
Using WebHelp Button:

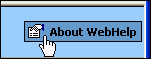
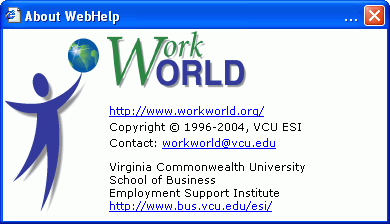
The About WebHelp button (with the Properties Page icon) at the far right side of the toolbar is a link to a new pop-up window that provides information and contacts for the WebHelp system.
About WebHelp Button:
About WebHelp Window:
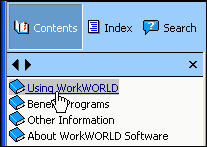
The Contents button (with the book icon) opens the Navigation Frame on the left side of the screen and displays the Table of Contents.
Contents Button:

The Table of Contents is initially displayed in condensed form, where books represent major sections. Click on a book or the link beside it to expand the Table of Contents.
Table of Contents:
Once you "drill down" to the page of interest, you can click on the page to make it display. As you browse through the additional topics, either by following the browse sequence (see Previous/Next Topic above) or by clicking links within the topic, the Expanded Table of Contents will follow your location within it. It automatically synchronizes with the displayed topic page, and opens additional chapters as necessary, highlighting the currently displayed topic.
Synced Table of Contents:

Clicking on the Index button (with the List page icon) will produce a list of all Index keywords.
Index Button:

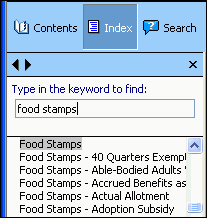
Index keywords appear in alphabetical order (numbers come before letters). There are literally thousands of Index keywords. You can use the scrollbar to move through them until you see the one of interest.
Index Keywords:
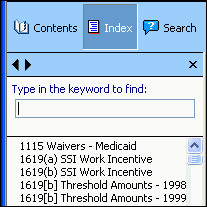
You can also type a few letters, a word, or several words in the box, and the Index list will follow what you enter, starting at the first match. Click on a keyword to go to the topic it indexes. If more than one topic uses that Index keyword, a list will display from which you can choose.
Find an Index Keyword:
Click on the Search Tab to begin searching foe every topic that contains a specific term.
Search Button:

This brings up an empty box where you can type the word(s) to search for.
Search Box:
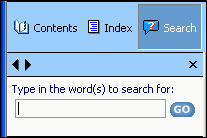
You can enter any word(s) or parts of a word to have the System find every topic that contains the term you enter. Click the Go button or hit the Enter key to begin searching for every topic that contains the search term.
Type word(s) to search for:
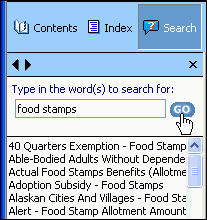
The Search will generate a list of topic names that contain the term you searched for. You can use the scrollbar to move through them until you see the one of interest. Click on one of the topic names in the list to display it in the right pane.
The top of the Navigation frame has several additional buttons that are used to control screen appearance and navigation.
Navigation Buttons (top of Navigation frame):
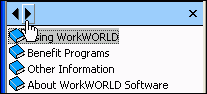
![]()
Clicking on the previous topic button (which looks like a left-facing arrow near the top of the navigation frame) allows you to jump to the previous topic in the Help system. These generally move in the same order as the Table of Contents. This button will not be functional at the beginning of a browse sequence or when a topic that is not included in the Table of Contents (such as a topic that provides context-sensitive help) is displayed.
Previous Topic Button:
Clicking on the next topic link (which looks like a right-facing arrow near the top of the navigation frame) allows you to jump to the next topic in the Help system. These generally move in the same order as the Table of Contents. This button will not be functional at the end of a browse sequence or when a topic that is not included in the Table of Contents (such as a topic that provides context-sensitive help) is displayed.
Next Topic Button:
Clicking on the Hide Navigation button (which looks like a big "X" near the top of the navigation frame) causes the display of the Help topic window to become a full-screen topic page, and the left frame used for Navigation disappears. (Click either the Contents, Index, or Search buttons on the toolbar to restore the Navigation Frame). See Appearance above.
Hide Navigation Button:
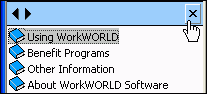
Certain browsers and/or certain combinations of browser options settings may prevent this button from being displayed. An alternative method of displaying a topic without showing the navigation frame is to click on the Topic URL link in the footer block near the bottom of each topic page.
Depending on the type of browser you use, it may be difficult to find the actual URL of an individual topic page. This is due to the fact that your browser's address toolbar may not always display the current topic URL, due to certain incompatibilities and/or navigational quirks found in many browsers.
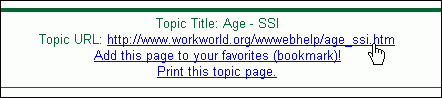
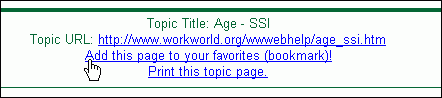
A footer block, near the bottom of every topic page, displays that topic's absolute URL on the WorkWORLD server. Clicking the Topic URL link in the footer will force the topic to display in a new window (without the navigation frame) that will display the true absolute URL if your browser's address toolbar is enabled.
Topic URL Link in Footer:
Instructions for adding a bookmark or favorite in your browser that points to a particular topic are shown below. Detailed instructions are provided for Internet Explorer and Netscape or Mozilla. If you use a different browser, consult its Help system for specific directions. In most cases, you should follow the steps shown in the Linking to a Topic section above in order to display the topic with its absolute URL before attempting to bookmark it.
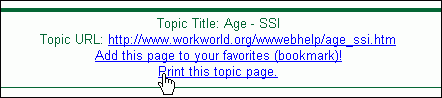
Internet Explorer permits programmatic control of the favorites list, so adding one is straightforward. A link to do so is provided in a footer block near the bottom of every topic page. This link only appears in Internet Explorer. Click on the link to start the process. It will open your browser's Add Favorite window, and you can choose which folder to create the favorite shortcut in.
Add Favorite Link in Footer:
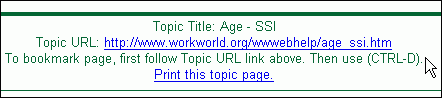
Users of Netscape or Mozilla need to first display the topic without frames to load the correct URL in their browser. Follow the steps shown in the Linking to a Topic section above in order to display the topic with its absolute URL before attempting to bookmark it.
Then simply hold down the Control key and press the letter D to create the bookmark:
![]() +
+ ![]()
If your browser is either Netscape or Mozilla, these instructions will appear at the bottom of every topic page.
Bookmark Instructions in Footer:
Usually, the simplest way to print a topic is to click on the "Print this topic page" link located in the footer block, near the bottom of every topic page. This will allow you to print just the topic frame, without any irrelevant navigation frame or browser window details.
Print from link in footer:
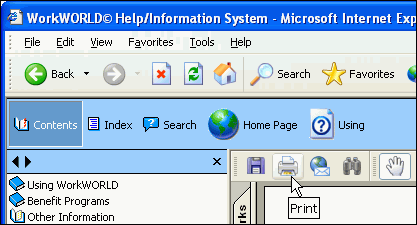
Optionally, the next simplest way to print a topic is to click the Print Icon on the browser toolbar. In most browsers, this causes the entire browser window to be printed, so the browser menu and toolbar and any open navigation frame details will print along with the topic contents.
Print from browser:

Alternatively, you could select File, Print from the browser menu. Finally, another way to print is to right-click with your mouse on the frame you wish to print, and select Print from the resulting menu.
By default, the Active Window will be printed. The Active Window is the last frame in which you clicked anything. Normally, the topic in the right frame is the area that you will want to print, so it must be the Active Window. One way to be sure that is always the case is to right-click anywhere on this frame, and choose Print as described above. Alternately, you can left-click in the frame, thereby making it the Active Window, and use either the Print Icon or File, Print methods described above.
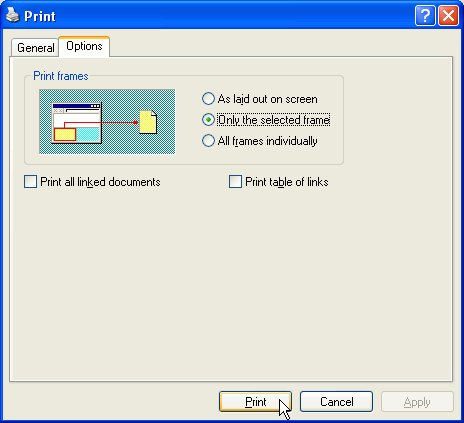
Unless you choose to print using the Print Icon on the Toolbar (which will use all defaults and bypass all Print Dialogs), you will need to OK Print Options. A typical option dialog is shown below (it is from Windows XP; other operating systems are similar). Note that it indicates Only the Selected Frame (the one last clicked) should be printed.
Print Dialog Box:
Some topics display PDF files using Adobe Acrobat Reader. You can detect these files because the link that led to them will tell you that Acrobat Reader is required. Additionally, when displayed, there is an extra Acrobat Reader toolbar displayed above the topic contents. Because of the file format, the PDF file type can only be printed from the Acrobat Reader toolbar Print Icon. Click it to print the topic contents. PDF files cannot be printed directly through the browser.
Acrobat Reader Toolbar Print Icon:
You can easily obtain an instant machine translation of any topic page into another language. The footer at the bottom of every topic page shows the available languages.
Language Translation Section in Topic Page Footers:
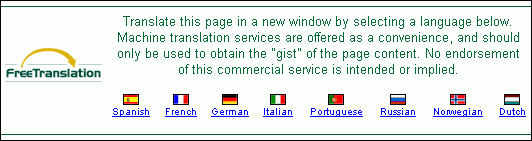
To translate a topic page into one of the available languages, simply click on the flag or link of the desired language. This will open a new window containing the translated page.
Note that machine translation is not as accurate as human translation. It should only be used to obtain the "gist" of the page content. Instant machine translation is a convenience, but computerized translations frequently have difficulty translating the words and phrases in the context of the original document.
A "gisted" translation allows readers to understand the meaning of the original document and determine its relevance to themselves or their business. Although not perfect, the machine translation returned offers a high level of accuracy and reader comprehension - and has the added benefit of being instantaneous and completely free.
WorkWORLD™ Help/Information System
![]() Share/Save: Click the button or link at left to select your favorite bookmark service and add this page.
Share/Save: Click the button or link at left to select your favorite bookmark service and add this page.
This is one topic from the thousands available in the WorkWORLD™ software Help/Information System.
Complete information about the software is available at: http://www.WorkWORLD.org
![]()
See How to Get WorkWORLD page at: http://www.WorkWORLD.org/howtogetWW.html
NOTE: Sponsored links and commercial advertisements help make the WorkWORLD™ website possible by partially defraying its operating and maintenance expenses. No endorsement of these or any related commercial products or services is intended or implied by the Employment Support Institute or any of its partners. ESI and its partners take no responsibility for, and exercise no control over, any of these advertisements or their views or contents, and do not vouch for the accuracy of the information contained in them. Readers are cautioned to verify all information obtained from these advertisements prior to taking any actions based upon them. The installed WorkWORLD software does not contain advertisements of any kind.
Copyright © 1996, 1997, 1998, 1999, 2000, 2001, 2002, 2003, 2004, 2005, 2006, 2007, 2008, 2009, 2010, 2011, 2012, Virginia Commonwealth University. All rights reserved.